At North Sydney Plunge Pools, we help you plan, design, and build the right pool for your space. Our team looks after approvals, design, installation, and safety checks so your project runs smoothly.
This checklist gives you the key steps you need before you start. You’ll learn about council rules, space checks, pool types, costs, and what to avoid so your build stays safe, stress-free, and on budget.
Step 1: Understand Sydney Council Regulations
Understanding Sydney council rules is one of the most important steps before you install a plunge pool at home. A pool must follow local building laws, safety rules, and approval pathways. These rules protect your home, your neighbours, and anyone using the pool.
In most Sydney suburbs, you will need one of two approval types:
- Development Application (DA)
- Complying Development Certificate (CDC)
A DA is checked by the council. A CDC is checked by a Private Certifier and must follow the NSW Complying Development Code. The CDC Code has strict rules for things like pool size, distance from boundaries, and how close the pool can be to doors, windows, or structures.
Your pool must also follow the Building Code of Australia (BCA), which covers structure, drainage, foundations, and safety rules. These rules make sure your pool is strong, safe, and built correctly.
Another requirement is meeting the NSW pool barrier rules. Every pool must have a fence or barrier that meets the Australian Standard AS 1926, including:
- Correct fence height
- Self-closing and self-latching gates
- No climbable objects near the fence
- Safe spacing between bars
Your pool also needs to follow setback rules, which explain how far the pool must sit from boundaries, homes, and neighbouring buildings. Many homes also have sewer easements, which are sections of land that plumbing pipes run under. You cannot build a pool on top of a sewer easement unless you get approval from Sydney Water.
If your home is in a heritage area, near a bushfire zone, or part of a strata complex, you may need more documents or extra checks. A Private Certifier or council officer will explain what applies to your home. For complex sites like strata or heritage zones, learn the council approval steps for plunge pools before you organise certifiers and documents.
Because pool rules change, it’s important to check the Sydney Council Portal, NSW Planning Portal, and NSW Fair Trading for the latest requirements. You can also look for a builder who is SPASA-accredited, as SPASA members follow strict industry standards.
Step 2: Assess Your Site and Space Conditions
Before you choose a plunge pool, you must check your site and space. The shape of your land, the soil, and the access can change how much your pool costs and how long the work will take. A simple site is fast and cheap to build on, but a tricky site can need extra work.
Start by looking at your soil type. Sandy soil, clay soil, or rocky soil can change how the hole is dug. Some sites need a geotechnical report (geotech test) to check soil strength, water levels, or if the ground needs extra support. This helps builders plan safe excavation and avoid surprises.
Next, check for stormwater drains, underground pipes, sewer lines, and electrical cables. These cannot be damaged during digging. Your pool also cannot sit on top of stormwater or sewer pipes unless Sydney Water gives approval. A quick “Dial Before You Dig” check can show where services run under the ground.
Look at your boundary setbacks, too. These rules say how close your pool can sit to fences and homes. Tight backyards need careful planning to make sure the pool fits safely inside the legal build area.
Check for tree roots, especially from big trees. Strong roots can push against the pool shell, and some protected trees cannot be removed without council approval. If your yard slopes, you may need retaining walls so the pool sits safely on level ground.
Access is also important. Trucks, cranes, and excavators need space to enter your property. Narrow driveways, stairs, or tight courtyards can make delivery harder. Some homes in Sydney need a crane to lift the pool over the house. If you’re unsure how delivery works on tight blocks, see the full plunge pool installation process guide before booking crane access.
Finally, make sure there is enough room around the pool for service access, such as pumps, filters, and future maintenance. Leaving this space now makes repairs easier in the future.
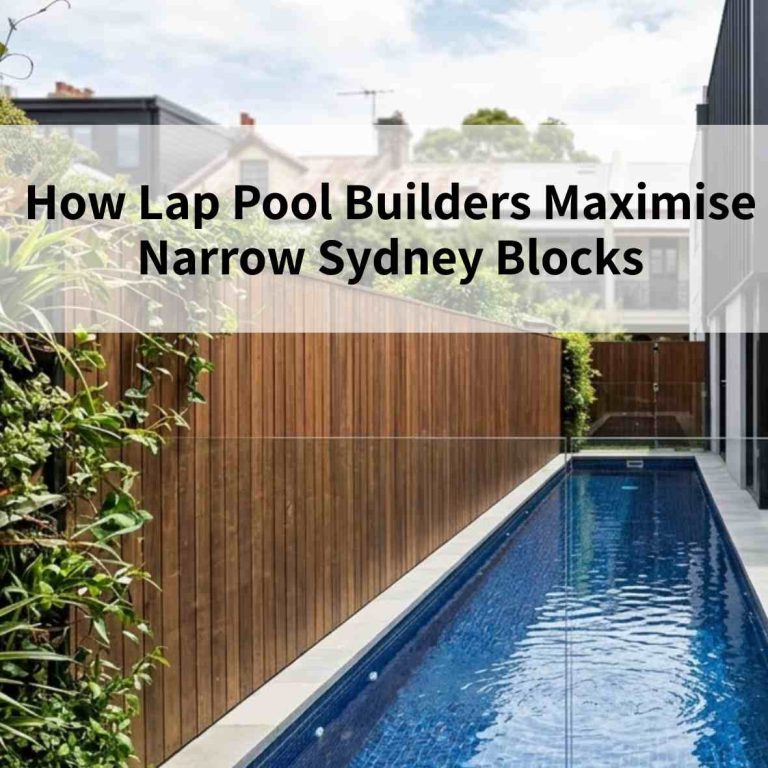
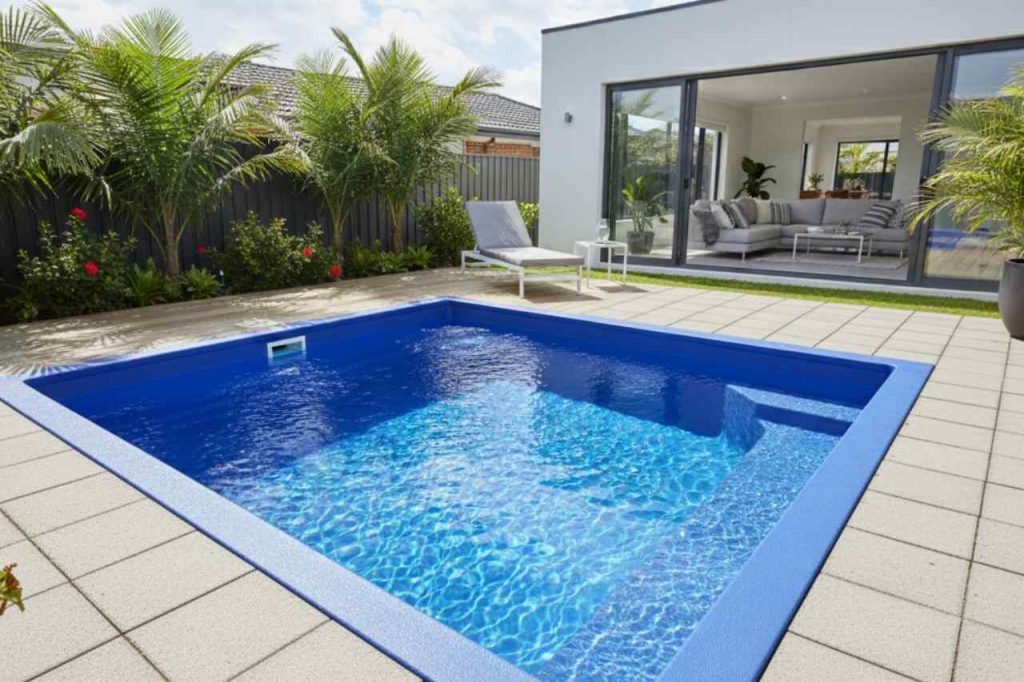
When a Plunge Pool Makes Sense for Your Property
Plunge pool is a smart choice for townhouses, duplexes, and narrow backyards. It fits tight spaces and adds value without taking over your garden.
We’ve built pools in Crows Nest, Mosman, and Neutral Bay. These homes used small courtyards to create calm, private outdoor areas. If you want a pool but don’t have much space, a plunge pool is the best fit.
Step 3: Choose the Right Pool Type
Choosing the right plunge pool type is important because each style suits different homes, budgets, and backyard conditions. The three main types are concrete, fibreglass, and precast concrete. Each one has its own strengths, finish options, and installation needs.
Concrete plunge pools
Concrete pools are the “custom universe” option. They can be shaped into almost anything because they are built on-site, layer by layer, much like forming a planet from dust. They support many internal finishes; pebblecrete, quartz, plaster, or tiles and they can integrate advanced systems like heating, automation, and lighting. In tricky backyards with slopes or odd shapes, concrete behaves like a flexible solution, adapting to the landscape instead of fighting it.
Fibreglass plunge pools
Fibreglass pools come as a single, smooth shell, much like a spacecraft built in a factory before being launched. Their fixed shapes make them predictable and fast to install. The gelcoat surface reduces algae and keeps cleaning simple. They support most heating options and basic automation, but they cannot change shape. They must fit the environment exactly as they are.
Precast concrete plunge pools
Precast pools are made off-site and delivered to your home as a complete shell. They are lifted into place using a crane, making them perfect for homes with tight access, narrow streets, or sloped blocks. The inside can be finished with plaster, quartz, or tiles, depending on the manufacturer.
Precast pools fit many heating systems and can use modern automation like Wi-Fi controllers, LED lighting controls, and automatic chlorinators. Because they arrive ready to install, precast pools offer the strength of concrete with much faster installation times.
Each pool type has different benefits, and the best choice depends on your space, soil, access, and design goals. Our team can help you compare every option so you choose the pool that fits your home and budget.
How a Plunge Pool System Works
A plunge pool works the same way as a full-size swimming pool. It uses a pump, filter, skimmer, return jets, and a chemical system to keep the water clean, warm, and moving.
Pump
The pump moves water through the pool system. It pulls water from the skimmer, pushes it through the filter, and sends it back into the pool through the return jets. A good pump helps lower power bills and keeps the water fresh.
Filter
The filter removes dirt, dust, and fine debris. Most plunge pools use cartridge filters or sand filters, depending on the size of the pool and the space available.
Skimmer
The skimmer collects leaves, bugs, and surface debris before they sink to the bottom. It also draws water into the circulation system.
Return Jets
Return jets push clean water back into the pool. They help create even water flow so chemicals spread properly and the pool stays smooth and balanced.
Chemical System
A chemical system keeps the pool safe. It may include a:
- Chlorinator (salt or mineral)
- Chemical doser
- pH balancing system
These systems stop bacteria from growing and help keep the water clear.
Heating Options
Many plunge pools include:
- Electric heat pumps
- Solar heating systems
- Gas heaters
A heat pump is the most common because it provides steady heat while using less power.
Automation Systems
Modern plunge pools can use smart automation. These systems let you control the pump, heater, lights, and chemical levels from your phone. Automation helps reduce running costs and makes maintenance easier.
Step 4: Plan for Plumbing and Electrical Requirements
Proper plumbing and electrical work is one of the most important steps when building a plunge pool. These systems keep your pool running safely and make sure the pump, filter, heater, and lighting work the way they should. All plumbing and electrical work must be done by licensed and qualified tradespeople, as required by Australian Standards.
Plumbing Requirements
Your pool needs the right pipes and water lines for filling, draining, and circulation. The plumbing system must include:
- Water supply lines
- Filtration pipes
- Backflow prevention devices (to stop dirty pool water from entering the main water supply)
- Stormwater drainage to remove excess water safely
- Wastewater discharge lines that follow council rules
If your backyard slopes or collects water easily, extra drainage may be needed to keep the pool shell and foundations safe.
Electrical Requirements
All electrical work around a pool must follow strict safety rules to protect the home and anyone using the pool. This includes:
- Dedicated electrical circuits for pumps, heaters, and chlorinators
- RCD protection (safety switches) to prevent electric shock
- Outdoor-rated cables and waterproof fittings
- Proper bonding and earthing for all metal parts
- Safe pool lighting that meets Australian electrical standards
Heating systems, including heat pumps, gas heaters, and automation systems, also need correct wiring to work properly.
Planning for Future Upgrades
It’s a good idea to install extra conduits or pre-wiring for future features, such as:
- LED pool lights
- Solar heating
- Smart pool automation
- Extra power for pumps or water features
Planning early helps you save money later and stops you from needing to dig up finished areas of your backyard.
Step 5: Set a Realistic Budget
Setting a realistic budget is one of the most important parts of planning a plunge pool. A clear budget helps you avoid surprise costs and makes the whole project smoother. Many homeowners only think about the pool shell, but the total cost includes a number of different items that work together to complete the build.
Main Costs to Include
A full plunge pool budget should include:
- Excavation: digging the hole, soil removal, or rock excavation if the site is hard.
- Pool shell or construction: concrete build, fibreglass shell, or precast delivery.
- Delivery or crane hire: especially for tight access or backyards with no direct entry.
- Fencing and gates: must meet the NSW pool barrier rules.
- Decking or tiling: around the pool area for safety and style.
- Plumbing and electrical work: pumps, heating, lighting, and drainage.
- DA or CDC fees: approval costs vary depending on your council.
- Power and water costs: ongoing running costs for pumps, heaters, and filters.
If your yard has a slope, soft soil, or drainage issues, you may also need retaining walls, drainage upgrades, or extra pipework.
Typical Cost Ranges
While prices vary by site, most homeowners should expect:
- Excavation: $3,000 – $15,000+ depending on soil and access
- Crane hire: $800 – $2,500+
- Pool fencing: $3,000 – $6,000
- Decking/tiling: $150 – $300+ per square metre
- DA/CDC approvals: varies by council
- Heat pump: $2,000 – $5,000
- Electrical work: $1,000 – $3,000+
- Plumbing: $1,500 – $4,000+
These numbers help you prepare for the real cost of the project.
Keep a Buffer
It’s smart to keep a 5–10% buffer in your budget. This helps cover soil issues, extra crane time, or last-minute upgrades. Planning this now saves stress later and keeps your project on track.
Common Mistakes or Hidden Costs to Avoid
Hidden costs can appear when building a plunge pool, especially if your backyard has tight access, tricky soil, or extra council rules. Knowing these possible costs early helps you plan a safer and more accurate budget. Most surprises come from the site, the soil, or the extra work needed to meet standards.
Access-Related Hidden Costs
If trucks or machines cannot get into your backyard, the builder may need:
- Crane hire to lift the pool over your home
- Traffic control for narrow streets
- Extra labour to move soil or materials by hand
Tight access is one of the biggest reasons a project becomes more expensive than expected.
Soil and Ground Conditions
Your soil affects how easy it is to dig the hole. Common issues include:
- Rock excavation, which needs rock breakers or saws
- Soil removal fees for extra loads of dirt
- Clay soil drainage problems, which need better stormwater systems
- Soft soil support, which may require extra concrete or stabilising the base
These conditions often can’t be seen from the surface and only show up once digging begins.
Plumbing and Drainage Upgrades
Some sites need more plumbing work than expected, such as:
- Extra stormwater drainage
- Longer plumbing runs due to poor access
- Backflow prevention upgrades (required for safety)
These add cost but are needed to follow local rules.
Structural Extras
Some yards need extra structures to keep the pool safe and stable. These may include:
- Retaining walls for sloped yards
- Extra concrete for pool footings
- Boundary setback adjustments that change the layout
These protect your home but can increase the budget.
Compliance and Safety Requirements
Extra costs can appear if you need:
- Stronger pool fencing
- Additional lighting to meet safety rules
- Gate self-closing systems
- Sydney Water approvals for easements
These rules keep your pool compliant with NSW laws.
With good planning and a proper site check, we help you spot these hidden costs early so your project stays safe, legal, and on budget.
Step 6: Prepare for Construction Impact
Building a plunge pool will affect your home for a short time, so it’s important to plan for the noise, the equipment, and the space needed. Good preparation helps the project run smoothly and keeps your property and neighbours safe.
Expect Noise and Working Hours
Pool construction uses excavators, concrete trucks, saws, and pumps. These machines create noise, so most work must follow NSW noise limits. Builders usually work during standard construction hours to stay within council rules. It’s a good idea to let your neighbours know when the project will start to avoid complaints.
Truck and Machinery Access
Trucks need a safe way to enter your property. This includes:
- Excavators for digging
- Delivery trucks for materials
- Cranes if the pool shell needs lifting
- Soil removal trucks
If you have a narrow driveway, steep slope, or shared access, the team may need traffic control or a different entry plan.
Material Staging and Storage
Your backyard or driveway will be used to store materials and equipment. This may include:
- Pipes and plumbing parts
- Concrete or gravel
- Pool fencing panels
- Timber or tiles
- Pumps, filters, and heating systems
Planning where these items should sit helps avoid damage to your lawn or garden beds.
Waste Removal and On-Site Safety
Excavation creates soil, rocks, and debris. All waste needs to be removed safely using skip bins or soil trucks. The site will also use temporary fencing to keep the area safe for children, pets, and visitors.
Driveway and Property Protection
Heavy machinery can mark or scratch driveways, so protective boards or mats may be used. Soft ground may also need boards to stop machines sinking into the soil.
By preparing early and understanding what to expect, you can keep your project smooth and reduce stress during the build.
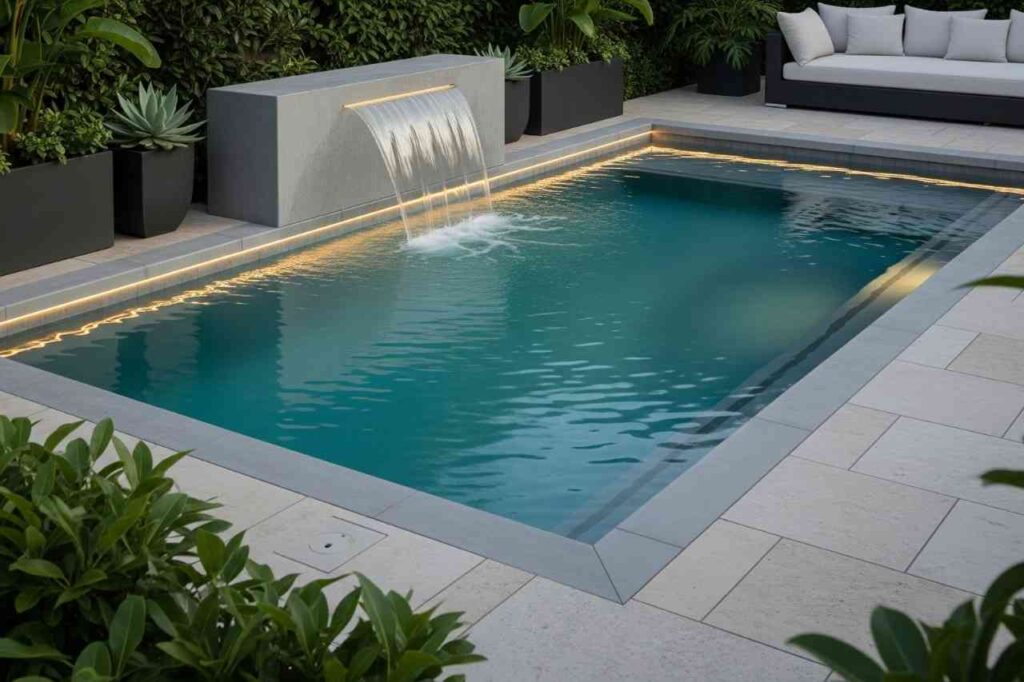
Step 7: Plan Landscaping and Aesthetics
Landscaping is the final step that makes your plunge pool look finished, safe, and part of your outdoor space. The right choices can turn a small backyard into a relaxing and stylish area. Good landscaping also makes the pool easier to maintain and more enjoyable to use.
Choose the Right Paving and Surfaces
The area around your pool needs safe and durable surfaces. Popular options include:
- Stone pavers (travertine, limestone, granite)
- Porcelain tiles
- Timber or composite decking
- Exposed aggregate concrete
These materials stay cool underfoot and give the pool a modern, coastal, or natural look. Make sure the surface is slip-resistant, especially for families.
Pick Strong Coping Tiles
Coping tiles sit along the pool edge. They protect the shell and make the area look neat. Common coping choices include:
- Bullnose coping
- Square-edge coping
- Natural stone coping
- Concrete coping blocks
Coping tiles should match your pavers and handle pool water, sun, and salt.
Add Plants That Suit Sydney Conditions
Plants soften the space and create a peaceful feel. Many Sydney backyards use:
- Native plants like lomandra, bottlebrush, and banksia
- Tropical plants like palms and bird-of-paradise
- Low-maintenence shrubs that don’t drop heavy leaves into the pool
Choose plants that handle sun, shade, and coastal winds.
Improve Privacy and Shade
Privacy screens help you swim in comfort. You can use:
- Timber slat screens
- Metal privacy panels
- Glass screens
- Tall hedges or bamboo
Shade structures such as umbrellas or pergolas also make the area cooler during summer.
Use Lighting for Safety and Style
Outdoor lighting helps with night-time swimming and creates a calm mood. LED strip lights, step lights, and garden spotlights work well around plunge pools.
Match Colours and Style to Your Home
Your landscaping should match your home’s design. Whether your house is coastal, modern, or traditional, your finishes, tiles, and colours should feel connected.
Step 8: Schedule Professional Inspections
Before you can use your plunge pool, it must pass a series of professional inspections. These checks make sure the pool is built safely and meets all NSW laws. The inspections cover the pool structure, plumbing, electrical work, and the safety barrier system around the pool.
Structural and Construction Checks
A qualified certifier or engineer must confirm that the pool shell is built properly. For concrete and precast pools, this may include:
- Form 15: a design compliance certificate
- Form 16: installation and construction compliance
These documents show that the pool was designed and built to meet Australian Standards and the Building Code of Australia (BCA).
Plumbing and Drainage Compliance
Your plumbing must be checked to ensure:
- Correct pipework
- Backflow prevention
- Stormwater drainage
- Safe wastewater discharge
These checks prevent leaks, flooding, or contamination.
Electrical Safety Checks
A licensed electrician must confirm that:
- Pumps and heaters are on RCD-protected circuits
- Pool lighting is safe and waterproof
- Bonding and earthing meet Australian rules
These checks reduce the risk of electric shock and equipment failure.
Pool Barrier and Fence Inspections
Before filling the pool, your safety barrier must pass an inspection under AS 1926. This ensures:
- Correct fence height
- Safe gate latch
- No climbable objects
- Correct spacing between bars
The barrier must be approved before anyone can use the pool.
Final Certification
Once all work is complete, a Private Certifier or council inspector will issue a:
- Final Occupation Certificate (OC)
or - Final Certificate of Compliance
This confirms that the pool meets all safety, structural, and legal requirements.
Step 9: Post-Installation Maintenance Checklist
After your plunge pool is installed, regular maintenance keeps the water clean, healthy, and safe to swim in. A simple weekly routine prevents problems and helps your pool equipment last longer. Good maintenance also keeps running costs down and protects your pool’s warranty.
Check Water Balance Each Week
Your pool water needs the right balance so it stays clear and safe. Test the water every week and make sure:
- pH levels stay between 7.2 and 7.6
- Chlorine or sanitiser levels stay in range
- Calcium hardness is correct to protect the pool shell
- Total alkalinity is balanced so the water doesn’t irritate skin
Balanced water stops algae, protects equipment, and keeps the water comfortable.
Clean and Maintain the Filter
The filter removes dirt and debris from the pool. Depending on your filter type:
- Cartridge filters should be rinsed every 1–2 weeks and deep cleaned every few months
- Sand filters need backwashing and occasional sand replacement
A clean filter helps the water flow smoothly and reduces power use.
Check the Pump and Return Flow
Make sure the pump basket is clear and the pump is running well. Check for strong water flow from the return jets, as weak flow may mean a blockage or a dirty filter.
Seasonal Maintenance
Different seasons need different care:
- Summer: test water more often, clean filters regularly
- Winter: run the pump fewer hours, use a pool cover to stop debris, and keep chemicals stable
- Stormy months: check drainage, remove leaves, and test water after heavy rain
Good seasonal habits stop long-term problems.
Heating and Equipment Checks
If you have a heat pump, solar heater, or automation system, give them a quick check each month to make sure:
- Cables are secure
- Settings are correct
- Timers and automation are running normally
Warranty and Support
We register your pool equipment warranty and offer simple maintenance plans if you want help keeping your pool in top shape.
How to Choose the Right Pool Installer or Designer
Choose a SPASA-accredited installer with the right licence, insurance, and strong local reviews. Always check past projects, warranties, and experience with your suburb’s rules.
Picking the right plunge pool installer is one of the most important steps in your project. A good builder keeps your pool safe, legal, and built to last. Before you hire anyone, check their licences, insurance, experience, and past work.
Look for the Right Licensing and Accreditation
A professional installer should have:
- A valid builder’s licence
- SPASA accreditation (Swimming Pool & Spa Association)
- Public liability and construction insurance
These protect you if something goes wrong and show the builder follows national industry standards.
Check Local Experience
Choose an installer who has built plunge pools in your area. Local experience means they understand:
- North Shore council rules
- Soil conditions
- Access challenges
- Setback and fencing requirements
Ask to see previous jobs in nearby suburbs so you know their work is reliable.
Review Past Projects and Photos
Look at:
- Before-and-after images
- Pool shell quality
- Coping and paving work
- Equipment installation
- Landscaping finish
This helps you see the builder’s real results and craftsmanship.
Ask About Warranties and Aftercare
Every good installer should give:
- Structural warranties
- Equipment warranties
- Clear service instructions
- Optional maintenance plans
A strong warranty shows confidence in the pool’s quality.
Check Communication and Transparency
A trustworthy installer should explain:
- Timelines
- Costs
- Site preparation
- Noise and access plans
- Inspection and certification requirements
Clear communication helps avoid surprises.
North Sydney Plunge Pools is trusted across the North Shore for safe, long-lasting builds, full certification support, and clear pricing from start to finish.
Conclusion
Installing a plunge pool is one of the best ways to upgrade your home and create a relaxing outdoor space. With the right planning, you can move through each stage smoothly from council approvals and site checks to choosing the pool type, managing plumbing and electrical work, and preparing for construction.
By understanding hidden costs, checking access, and planning your budget early, you can avoid delays and unexpected expenses. Good landscaping, safe inspections, and simple weekly maintenance keep your pool looking great and working well for many years.
At North Sydney Plunge Pools, we help homeowners through every step of the journey from design, approvals, and installation to inspections and aftercare. If you’re ready to start your project, our team is here to help you build a beautiful and long-lasting plunge pool that fits your lifestyle and your home.
FAQs
How much does it cost to install a plunge pool in Sydney?
Most plunge pools cost $30,000 – $60,000, depending on size, materials, and site access. Concrete builds cost more, while fibreglass and precast options are faster and cheaper.
What are the best heating options for a plunge pool in cooler months?
Electric heat pumps and solar panels are the most common. Heat pumps keep a steady warmth, while solar heating is cheaper over time. Pool blankets help retain heat and lower bills.
Can a plunge pool be installed above ground?
Yes. Above-ground precast pools work well for sloped or tight sites. They’re placed by crane and finished with decking or cladding for a clean look.
How do I keep my pool water clean in winter?
Run the pump a few hours a day, test water weekly, and use a pool cover to keep out debris. Keep pH and chlorine balanced to protect your system.
Which materials suit coastal or shaded Sydney homes?
Glass tiles, precast concrete, and quartz render resist salt and algae. Light colours reflect better in shaded areas and keep the water clearer.
Can a plunge pool double as a spa?
Yes. Add spa jets, heating, or seating ledges to create a hybrid plunge pool-spa design for both exercise and relaxation.